|
ramé-hart instrument co. March 2015 Newsletter |
| Five things to know about icephobicity |
|
Here in New Jersey, we've just wrapped up
the coldest February in over forty years. And it's not that I don't like the cold, but
winter seems to bring a whole new set of challenges to our daily
existence. Ice, in particular, creates headaches for airlines,
motorists, and even people trying to walk on sidewalks. Wouldn't it be great if
we could come up with new ways to make surfaces less likely to ice up?
That's exactly what researchers developing icephobic materials are
doing. Here are five things you need to know about icephobicity: 1. Icephobicity is a relatively new field of study. While researchers have been studying hydrophobicity for decades, the study of ice-repelling surfaces has only begun to be seriously addressed in the past few years. In fact, the term "icephobic" only first appeared in a paper by NASA which was published in 2008.1 2. Superhydrophobic surfaces are not necessarily icephobic and vice versa. Early in the study of icephobicity researchers debated the relationship between superhydrophobic and icephobic surfaces. For the most part, they have concluded that there is no direct relationship between the two. And while it may be true that some superhydrophobic surfaces are also icephobic, they are not necessarily so and, in fact, there are cases where superhydrophobic surfaces exhibit increased adhesion to ice.2 3. Icephobicity is not so easily characterized. Here are the three most common methods for characterizing anti-icing surfaces: First, if the critical shear stress is low (e.g., below 500 kPA), then there will be a low adhesion force between the ice and the surface. Ice build up on surfaces like power lines, for example, will simply release from the weight of the ice. Second, a surface which inhibits the buildup of ice in the first place is considered icephobic. However, the characterization of this behavior is not so easy since there are many variables that affect the freezing process - temperature, whether the cooling is happening at the surface or from the vapor, relative humidity, and other factors. Third, an icephobic surface is said to be one that repels small droplets of mist or rain at below freezing temperatures.3
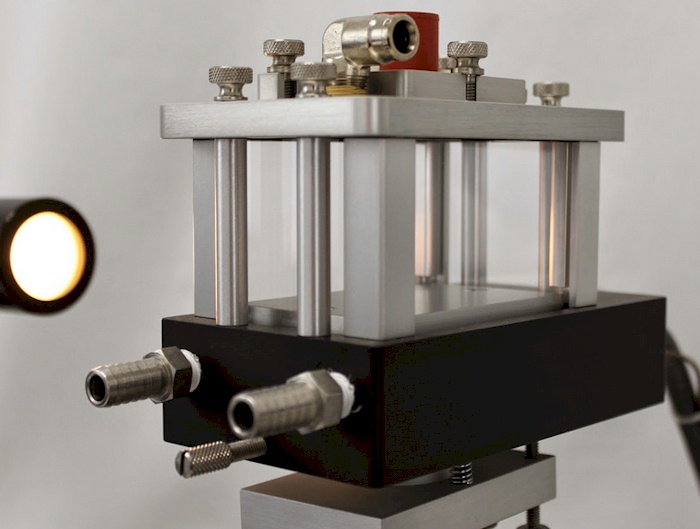
4. There is a big difference between de-iced and icephobic surfaces. Airplanes are often temporarily de-iced with a de-icing fluid when cold weather warrants as ice buildup on wings can alter the airfoils and lead to loss of control or too little lift to keep the airplane in the air. If the airplane shell were constructed with icephobic materials, by contrast, de-icing would not be necessary as the body would inhibit ice buildup in the first place. Researchers at Harvard are working on a nano-scale surface that retains an oil which promotes icephobic behavior on treated aluminum airplane body parts.4 It's a bit early to tell if this technology will take off. 5. If you are developing icephobic materials or studying wetting properties in subfreezing environments, you need the right tools. The ramé-hart Peltier Environmental Chamber is the only goniometer / tensiometer based chamber on the market that offers a chilled environment down to -50°C. For more details on this product including a brochure and pictures, see http://www.ramehart.com/accessories.htm#100-30.
1
Cold Regions Science and Technology Volume 52, Issue 2, April 2008,
Pages 224–243. See:
http://www.sciencedirect.com/science/article/pii/S0165232X07000523.
|
| Tips for measuring contact angle on reflective surfaces |
|
All editions of DROPimage have a cool tool
called "baseline snap" which allows the user to automatically
snap to the
baseline. This is a great feature and works well on many surfaces.
However, on reflective surfaces, another strategy is necessary. In this
month's video tutorial, we walk through three tips for measuring contact
angle on reflective surfaces using any edition of DROPimage.
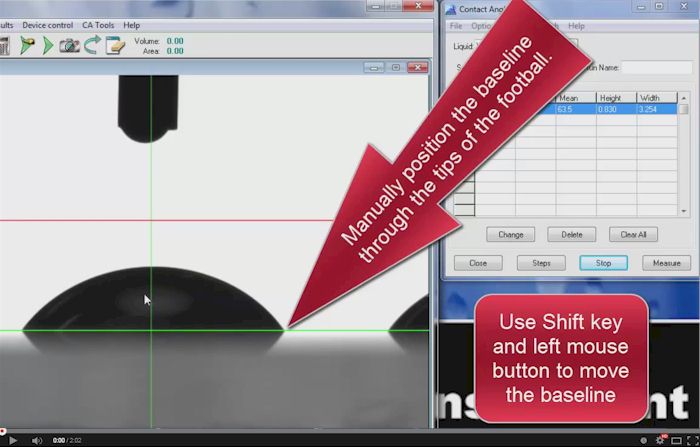
The first method is to simply manually locate the baseline through the "tips of the football". Use the left mouse button with the Shift key or click on the image and use the up and down arrow keys to move one pixel at a time. Sometimes, however, we would like to take the measurement sooner after the deposition of the drop in order to capture the initial contact angle prior to the effects of wetting and evaporation. The second method is to place a small micro-drop in order to setup the baseline and then dispense the full drop and measure immediately. For the third method, we bring a pendant drop down to nearly touching the surface, we locate the baseline midway between the bottom of the drop and its reflection. Then we lower our pendant drop so it releases on the surface and click measure without any delay. I hope you have found this video useful. We now have 35 videos with over 75k views. If you would like to check more of our videos, go to: https://www.youtube.com/user/ramehart/videos. Click on Subscribe if you find them useful. Contact us if you would like to request a video and we'll add it to our project list. |
|
Regards,
Carl Clegg |


