|
October 2022 |
| Tunable Wetting Behavior - Part One |
|
We spend a lot of energy in this
monthly column talking about novel ways for making surfaces more
hydrophobic, even superhydrophobic. And sometimes hydrophilic, too.
But what if you want to change the wetting behavior of a surface.
And then change it back again. This requires a different perspective. We call this tunable wetting. And there are a number
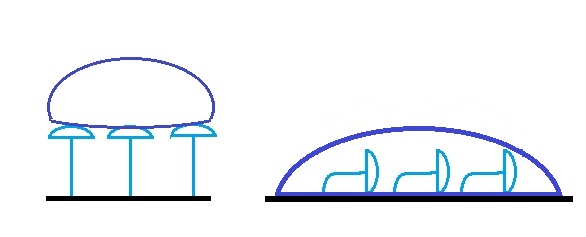
of ways to make this happen. In the old days, if you wanted to change the wetting behavior of a surface, the solution involved replacing the coating via surface modification or surface treatment. Then to put it back, it would require replacing the surface yet again. With tunable wetting, it's possible to change the wetting behavior of a smart responsive surface simply by using an external stimulus. And there is a variety of stimuli that could be used depending on the smart surface design. Let's take a look at a few of them this month. Researchers at the Karlsruhe Institute of Technology in Germany, for example, have found silanization and desilanization to be effective processes for switching the wettability of nanoporous polymer coated surfaces.1 By removing the fluoroalkyl silane with fluoride anions using tetrabutyl ammonium fluoride, the treated surface can be made hydrophilic, its natural state, in less than 120 seconds. Then, in the same short time, the surface can be returned to its hydrophobic state by coupling a fluorinated alkyl silane. Magnets can also be an effective stimuli. Researchers at Clarkson University developed a superomniphobic microtextured surface that relied on small nail-shaped nickel features which promote a non-wetting behavior.2 When a magnetic field is introduced, the nail-like features are pulled down and the surface changes from a Cassie state to a Wenzel state as shown in the image below. The surface changes from superominphobic to omniphilic. This action is highly reversible by simply removing the magnetic field. One of the compelling advantages to this method is that it seems to work with every imaginable organic liquid.
Another novel approach to reversible switching behavior is the use of binary polymer brushes. Consider the graphic below. A surface is made up of two types of polymer nanohairs. Since different polymers react differently to a particular solvent, the surface can be modified by using Solvent A to cause one of the sets of polymer brushes to coil while the other type will remain erect. See surface A in the graphic below. By using a different solvent (Solvent B), the opposite behavior (see Surface B) is achieved and so too is the wetting behavior - from hydrophobic to hydrophilic. Researchers in Germany have investigated this phenomenon.3
The two factors that primarily drive surface wettability are surface topology and chemical composition. In the case of modifying the surface topology, researchers at Purdue and NIST have investigated the use of creating tunable micro-wrinkles on rough surfaces.4 The video below (or click here) from MIT beautifully illustrates how wrinkles can be precisely controlled in terms of size, periodic spacing, angles, and so on - just by releasing tension on one axis and then the other in a precise order. Naturally, the wetting properties can be tuned precisely.
Stay tune for part two coming soon which will cover some of the additional stimuli used to control wetting properties on smart responsive surfaces. These include electrical stimulus, change in temperature, electromagnetic radiation, and more. Notes |
| Tech Tip |
|
Whether you are measuring contact
angle on smart responsive surfaces or regular old solids, there are
times when the surface energy is strong and the surface is polished
(e.g., glass) and the contact angle is low. In these cases,
identifying the baseline can present some challenges - challenges
which can be easily overcome if you know the right tricks. In this
video1,
we present four methods for selecting the correct baseline location
even when the snap tool does not find it. The first method is to simply manually position the baseline. Remember to hold down the Shift key while using the left mouse button to position the baseline manually. You can also use the up and down arrows on the keyboard to move the baseline one pixel at a time. Just be sure to click into the image first. Or, if you have a large distance to cover, hold down the Ctrl key while using the up and down arrow keys, and the baseline will move 10 pixels at a time. The second method involves placing a microdrop on the surface. Usually whatever fraction of a microliter of test liquid that is already at the tip of the needle is sufficient. Watch the video and you will see how this works. Once you have a microdrop, it's easy to set the baseline. Now when you go ahead and dispense a full-size drop, even if the contact angle is near 90°, the baseline will be correctly positioned. The third method involves bring the pendant drop down to the reflective surface and then watching for the mirror image to appear on the surface. Once the drop and its reflection are close, it's easy to position the baseline where they nearly meet. If you have a trick you would like to share, please let us know and we'll make a video and feature it in a future tech tip column. 1 See this video: https://youtu.be/934ov16YaB4 |
|
Regards,
Carl Clegg |


